This is a Game Kids Love with an Easter Twist

As an elementary music teacher I spend time with lots of children- more than a thousand every week.  Throughout the years I have found one  game that is every child’s favorite- honestly, they NEVER tire of this game.  Although I play this game at school it is also the perfect game for a family reunion.  It doesn’t  matter how large your family is this game will accommodate any number of people.

The game is played like the “Four Corners” game with a slight difference- there are SIX “Corners” in this game.

dice

You’ll need a dice for this game. Designate six spaces in your area as space #1, 2, 3, 4, 5, and 6. Put up simple signs for each area or use numbered hula hoops. While music is playing, have the kids move or dance around the area.

Play music or set a timer and let your family move or dance around until the timer dings or the music stops.  Kids should move to one of the six spaces. Roll the dice, and the kids at that number are out. (I have a large 3- inch die I like to use) Start the music again and continue until you have one or two children left- they are your winners.

egg

Now, just in time for Easter, here’s an Easter twist to the game.  Put six different colored plastic eggs in each corner.  Instead of rolling a die draw a color from a hat.   Once the players have selected a corner, the game director pulls out a color from a hat and those players standing in that corner are eliminated from the game.

Let your family move or dance around and repeat the process.  Be sure and put  the color you pull out back into the hat

Play until there is a winner. Kids enjoy playing this Easter game so budget lots of time for this game.

The best thing about this game is that you can easily adapt to your reunion theme.  If you are having a Western family reunion you can use western items in your corners- horse shoe, cow, saddle etc.  You could also use wanted pictures of famous outlaws in each corner- Billy the Kid, Butch Cassidy, Doc Holiday etc.  You can also play this in a private swimming pool. Participants swim around until the music stops and then they have to quickly swim to a number. 

Whatever your family reunion theme- this game will be a great addition to the  fun!

Aunt MO

Funny Food and Games for Your Family Party

My family didn’t go trick or treating when I was a kid, we attended school carnivals and had fun celebrations at home.  Uncle Steven’s family perfected trick or treating and got it down to a science.  Somehow, when Uncle Steven and I married we took the traditions of both families and through trial and error came up with our own family traditions.  So here’s a few of our favorite food and games for this spooky time of year.  The first is a recipe my daughter, Megan, found and it is so yummy she has been banned from making it again this year- these eyeballs are just so good we can’t stop eating them!

Spooky Peanut Butter Eyeballs

Ingredients:

clip_image0042 cups powdered sugar

½ cup creamy peanut butter

3 Tablespoons butter, softened

½ – 1 pound white chocolate candy coating

Small bag of M & M’s or Skittles

Tube of red decorator frosting

1. Blend peanut butter and butter until creamy. Add sugar. Continue beating until it comes together and is about as thick as thick cookie dough. When well blended shape into 1 inch balls and put in the fridge on waxed paper to chill until firm. (30 minutes)

2. Melt the white candy coating in the microwave. Microwave in 60 second intervals stirring at the end of every minute until candy is smooth and creamy. Dip peanut butter balls in the candy coating and place back on your waxed paper. Immediately press a candy on top to make an iris. Place back into the fridge until set.

3. Using the tube of red decorator frosting make red squiggly blood vessels.

HINT: Since taking these photos we have found that to clean your eyes up a bit, use a paring knife to cut the excess candy coating from the eyeball- it will give your eyeball a cleaner look.

clip_image006

Bouncing Eyeballs Take a ping pong ball and decorate with markers to look like blood shot eyes. Then get a plastic pumpkin or party cups. Now give each child an eyeball and place the plastic pumpkin or cup at the bottom of stairs or across the floor. Have each player toss or bounce the eyeball down the stairs or across the room. The goal is to see if their eyeball bounces into the pumpkin. You can give a prize to those that get it in the pumpkin. Also for young kids, you may want to place paper cups together and have each cup worth a prize.

Mummy Pizzas

My favorite hair stylist, Stephanie, shared this recipe while she was doing my hair on Saturday. Of course, my daughter and I had to come right home and try it! To make pizzas look like mummies just lay strips of cheese pulled from a cheese stick across the muffin for the mummy’s wrappings. This was the hardest part of this recipe for us. Arranging the cheese “just right” takes a little talent- you want the cheese to look like “wrapping” not a picket fence or a white window blind.

clip_image008

Ingredients:

Whole wheat bagels

Pizza sauce or spaghetti sauce

Black olives, sliced

Pepperoni

String cheese

Instructions:

Heat the oven to 350º F.

1. For each mummy, spread a tablespoon of pizza sauce onto each bagel half.

2. Set olive slices in place for eyes. Bake 10 minutes or until cheese melts.

3. Bake for about 10 minutes or until the cheese is melted and the bagel is toasty.

clip_image010

Mummy Wrap

Equipment Needed – One roll of toilet paper for every team. Split into teams of two and give each team a roll of toilet paper. Then one person tries to turn the other into a mummy. Everything has to be covered except the eyes. First team done wins.

Flaming Ghost Cake

Boo! This ghost will surprise and delight your family and friends when you turn off the lights and let his flaming ghost’s eyes flicker and dance. This fun and clever cake is quick and easy to make.  I was given this recipe the first year Uncle Steven and I were married.

clip_image012

Ingredients:

Bake any flavor cake mix in a 9 X 13 pan. Grease and flour pan well so that you can dump it out onto f flat cookie sheet or foil wrapped cardboard. Cut cake into your favorite ghostly shape.

Frost with Grammie’s famous “Fluffy Frosting” recipe.

Grammie’s Fluffy Frosting

Grammie used this frosting in place of 7 minute frosting because you don’t have to cook it. Adding the HOT water is the secret.

Combine in a mixing bowl:

1 cold egg white (reserve egg shell halves)

1 cup granulated sugar

¼ teaspoon cream of tartar

½ cup of BOILING water

½ teaspoon vanilla

Whip on high speed for 10- 15 minutes. Frost cooled cake with fluffy frosting.

Place the 2 egg shell halves you reserved round sides down on the cake for the eyes. Place one sugar cube in each shell half. Make a mouth out of licorice string, chocolate chips or candies.

Just before serving, pour ½ teaspoon of lemon extract over each sugar cube. Light the eyes.

Ghosts in the Graveyard
Choose one person to be the "ghost".

Have everyone but the ghost stand at the home base while the ghost runs off to hide somewhere outside.

Chant slowly as a group, "One o’clock… two o’clock… three o’clock…" and so on, up to twelve o’clock. Then shout, "Midnight! I hope I don’t see the ghost tonight!" Alternatively, "Starlight, star bright, I hope to see a ghost tonight!"

Leave the home base and search for the ghost in the yard. The ghost’s job is to jump out, surprise, and tag a player. When anyone encounters the ghost they should yell, "Ghost in the graveyard!" and try to run away. When the ghost catches someone, they become a ghost too. Anyone who is able to run back to home base is safe.

Have all the people who were caught go and hide with (or close to) the original ghost. The people on the home base start again with the chant, "One o’clock… two o’clock…"

Continue the game like this until everyone is caught.

The last person caught becomes the ghost for the next round.

Extra Easy Pumpkin Cookies

image

Ingredients:

14 ounce can pumpkin mix or use pure pumpkin and add pumpkin pie spices

1/2 cup butter, softened

2 eggs

1 (18.25 ounce) package spice cake mix

Mini chocolate chips, optional

Cream cheese frosting, optional

Directions

  1. Preheat oven to 350 degrees. Lightly grease two baking sheets.
  2. Beat the pumpkin, eggs, together in a large mixing bowl. Stir in the cake mix until well blended and creamy. Add chocolate chips if desired. Drop by spoonful’s on prepared baking sheets. Frost with cream cheese frosting.
  3. Bake in preheated oven until tops are firm when lightly touched, 10- 12 minutes. Cool on racks.

“Crazy” is a relative term in my family!

Aunt MO

What do Pudgies, Toasties, Jaffles and Hobos Have in Common?

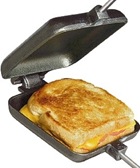
No, we’re not talking about the loved ones that will be attending your family reunion- we’re talking about Pie Irons! Pie Irons are known by many different names, Pudgie Pies, Pioneer Pies, Fire Pies, Toasties and Jaffles, but each name is referring to ingredient-filled "pockets" of bread toasted over a campfire. Cooking with pie irons is a long time tradition at our family reunions.

Camp cooking doesn’t have to be just hot dogs and roasted marshmallows. Our family reunions wouldn’t be complete without a delicious raspberry pie cooked over the campfire and sprinkled with sugar and cinnamon. With a pie iron, you can cook anything from a simple grilled-cheese and ham sandwich to a delicious berry pie for dessert.

In its most basic function, a pie iron is a way to cook grilled cheese sandwiches and fruit pies over an open fire. This is done by placing the food inside the pie iron and then locking the two sides closed with a metal hook. Metal rods with wood handles extend from the castings so the user can easily maneuver the pie iron over a campfire. A few minute over the heat, usually 4 to 6 minutes, and you will have perfectly toasted sandwich or pie.

Pie Irons are available in both cast iron & aluminum. Our family prefers cast iron. They come in several different shapes; round, square, oblong and double. For our family reunions, we only use square irons.product_thumb.php A slice of bread fits perfectly in a square pie iron but the “waffle” pie irons I’ve seen look fun too. Some day I’m going to buy waffle style irons for our family reunion and use them for breakfast. Aunt Lynn doesn’t think she’s had breakfast unless she has had a piece of toast so we’ve even used our pie irons for toast.

To make the most simple of pies, just take two slices of bread (buttered on the outsides), fill with jam, cheese, meat or pie filling- you don’t need much, then place inside the pie iron and lock it closed. Hold it over your campfire for a few minutes on each side and you’ll soon be eating a grilled cheese sandwich or a scrumptious apple pie.

At our family reunions, we like to make fruit pies in the evening while we are sitting around the campfire visiting, singing or playing games. About ten years ago, at a family reunion, cousin Mindy suggested that we sprinkle our freshly baked pies with sugar and cinnamon when we dump it out of the pie iron. Yummy! Some of our favorite flavors of fruit pies are lemon and raspberry. Another family favorite at our family reunions are “Cherry Cheese Turnovers- the recipe is below.

Cherry Cheese Turnover

Cream Cheese

Cherry Pie Filling

Butter or Pam cooking spray

2 Slices of white bread

Butter or add cooking spray to one side of each slice of bread and place buttered-side-out in pie iron.  Fill with a Tablespoon of cream cheese and a Tablespoon of cherry pie filling.  Cook on camp stove or in fire until golden brown.  Sprinkle with sugar and cinnamon.

Pie Irons are great for making ham and cheese sandwiches, individual pizzas and dessert pies but you don’t have to always use bread pockets when you use your pie irons. At our family reunions, we have made omelets and hash brown potatoes in our pie makers. Use your imagination- I even heard of a family that makes Baked Alaska in their irons. That’s a recipe I’ve got to try! Here’s a fun recipe using tortillas.

Quesadilla

10" Flour Tortilla’s

Shredded Cheese

Grilled Chicken Strips

Taco Seasoning

Sour Cream, olives, salsa etc.

Spray both sides of Irons well, with non stick cooking oil. Lay Tortilla in middle of one Pie Iron. Fill with 3 to 4 strips of cooked and thawed chicken, sprinkle 1/8 cup of cheese and taco seasoning to taste. Fold the Tortilla in on all sides, close Pie Iron and cook until Tortilla is golden brown on both sides.  Serve cut in half with sour cream and salsa.

A basic pie iron can be purchased for about $20.00 at Sporting Goods/Camping & Outdoor Stores, BBQ & Kitchen Specialty Stores, Campgrounds, RV Stores, & Hardware stores. I once stumbled onto store liquidation and bought pie irons for $6.00 a piece. I bought every iron they had in stock. An online resource .

You don’t need a pie iron for every person at your family reunion, just cook your pie and pass the iron onto the next person. After you’ve introduced your family to pie irons at your next family reunion everyone will want to have one- selling pie irons might even be a great fund raiser! More great recipes can be found at www.familyreunionhelper.com under “Tried and True” recipes.

“Individually, we are one drop. Together, we are an ocean.” – Ryunosuke Satoro

Aunt MO